Login and Data transfer
Obtain Login Credentials
In order to use ARIS resources first you need to apply for access , as described on the “system’s official access policy”
https://hpc.grnet.gr/access_policy/
After your application has been accepted, ARIS user support team will request the following information :
- Fill in, sign and send the Acceptable Usage Policy (AUP) for your project.
- Your preferred username.
- Your ssh public key.
- One static IP address (or addresses), from which you will connect in the system.
Login to ARIS
ARIS supercomputer uses login nodes for interactive access and the submission of batch jobs.
The login node host name address:
| Login address | Port | Protocol |
|---|---|---|
| login.aris.grnet.gr | 22 | ssh |
Login with Secure Shell
Access via SSH (Secure Shell).
Linux/Mac Terminal
On Linux or Mac use
ssh -i /path/to/rsa -YC username@login.aris.grnet.gr
In case of problems confirm your key permissions
chmod 600 /path/to/rsa
Windows
On Windows you can select to use
Login with PuTTY
http://www.chiark.greenend.org.uk/~sgtatham/putty/
- Run PuTTY
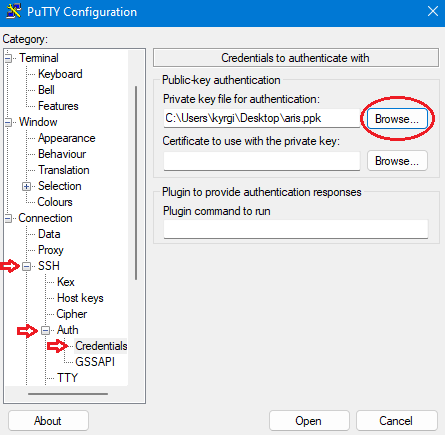
- Set your “Putty Private Key” file. Category: Connection -> SSH -> Auth -> Credentials
(To create or convert putty private keys use PuTTYgen (an RSA and DSA key generation utility) )
- Set the Host Name to “login.aris.grnet.gr”

Login with BitVise
Bitvise SSH Client: SSH Terminal, Tunneling, File Transfer
https://www.bitvise.com/ssh-client-download
- Set Host to “login.aris.grnet.gr”
- Set your Username
- Set Initial method to “publickey”
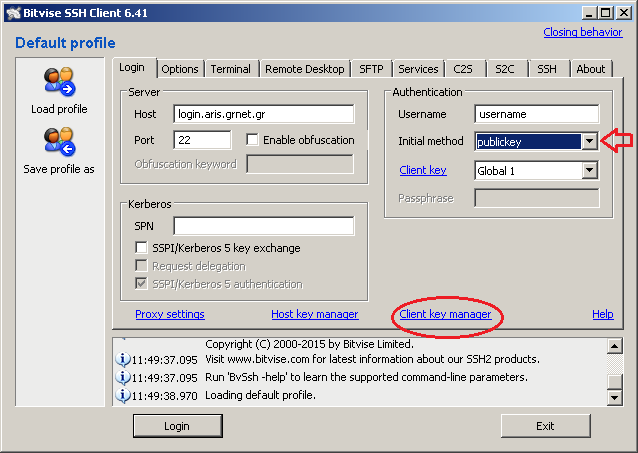
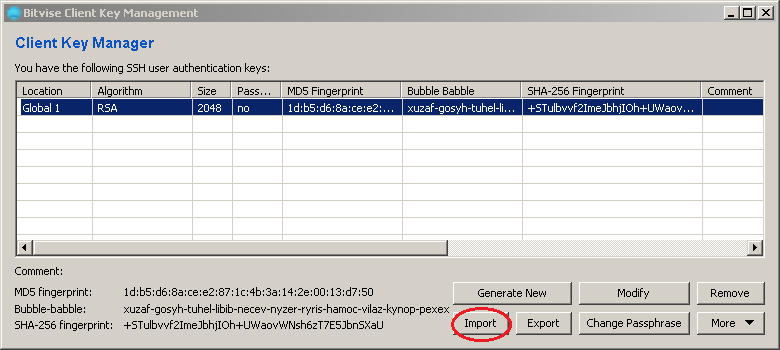
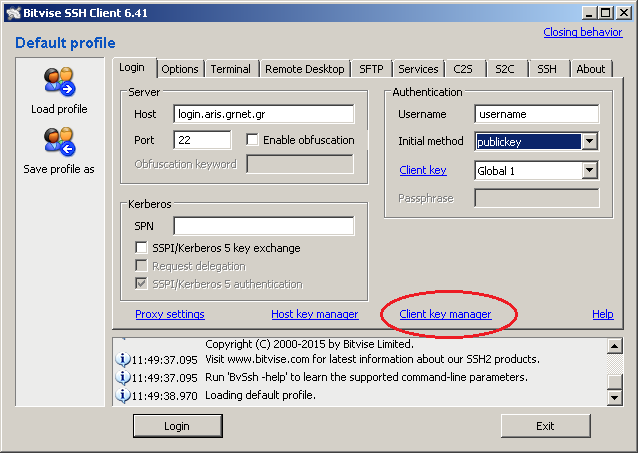
- Import your private key (Click “Client key manager”)
- Click “Import”
Generating SSH keys
https://wiki.archlinux.org/index.php/SSH_keys
SSH keys serve as a way to identify users to an SSH server without involving passwords.
In order to generate a NEW key follow these steps:
Linux/Mac
- Check for existing SSH keys on your computer.
$ ls -la ~/.ssh
# Lists the files in your .ssh directory , if they exist

#  By default, the filenames of the public keys are one of the following:
#
# id_dsa.pub
# id_ecdsa.pub
# id_ed25519.pub
# id_rsa.pub
- An SSH key pair can be generated by running the
ssh-keygencommand:
$ mkdir ~/.ssh
$ chmod 700 ~/.ssh
$ ssh-keygen -t rsa -b 4096 -C "your_email@example.com"

Generating public/private rsa key pair.
Enter file in which to save the key (/home/username/.ssh/id_rsa):
Enter passphrase (empty for no passphrase):
Enter same passphrase again:
Your identification has been saved in /home/username/.ssh/id_rsa.
Your public key has been saved in /home/username/.ssh/id_rsa.pub.
The key fingerprint is:
dd:15:ee:24:20:14:11:01:b8:72:a2:0f:99:4c:79:7f your_email@example.com
The key's randomart image is:
+--[RSA  4096]---+
|     ..oB=.   .  |
|    .    . . . . |
|  .  .      . +  |
| oo.o    . . =   |
|o+.+.   S . . .  |
|=.   . E         |
| o    .          |
|  .              |
|                 |
+-----------------+
Windows
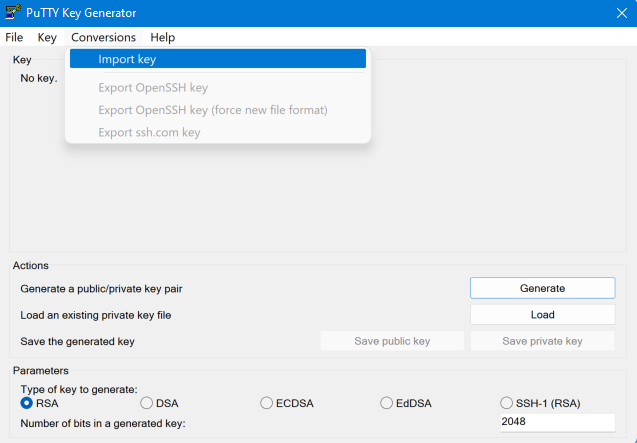
PuTTYGEN
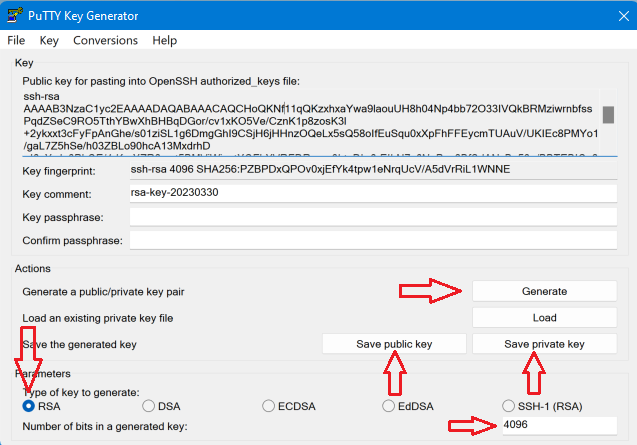
You can use PuTTYgen tool (download here )
to create new or import existing private keys
** Create NEW **
- Click “Generate”
- Move your mouse over the blank area ....
- Save your key pair “Save public key” and “Save private key”
** Convert to “PuTTY Private Key” format**
BitVise Client Key Manager
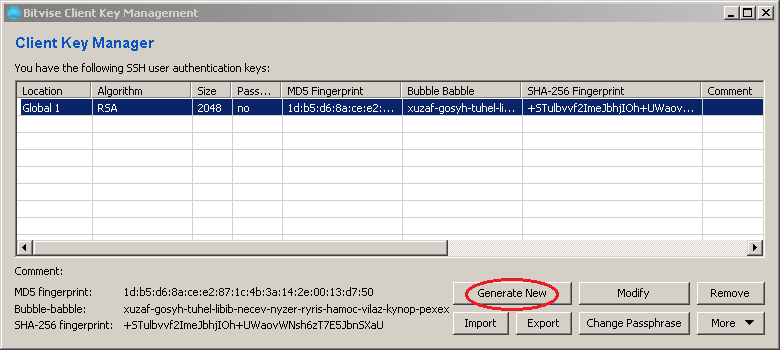
You can use BitVise “Client Key Manager” to create new or import existing private keys
Create NEW
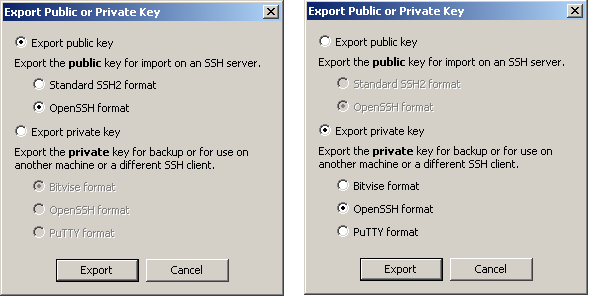
- Save the key pair Export -> OpenSSH format
Import Key
- Click “Import”

Data Transfer
To transfer data in and out ARIS scp and sftp protocols are used.
Restrictions
You have access from your computer to ARIS, but the inverse does not apply.
Put files to ARIS
Push a local directory from your computer to ARIS
scp -i /path/to/rsa -r localdir username@login.aris.grnet.gr:remotedir
or
sftp -i /path/to/rsa username@login.aris.grnet.gr
put -r localdir remotedir
Get files from ARIS
Get a remote directory from ARIS to your computer.
scp -i /path/to/rsa -r username@login.aris.grnet.gr:remotedir localdir
or
sftp -i /path/to/rsa username@login.aris.grnet.gr
get -r remotedir localdir
More information about using scp, sftp commands
man scp
man sftp
Archive
Compress directory into archive
tar -czvf archivename.tar.gz directory
Uncompress archive
tar -zxvf archivename.tar.gz
Data Transfer Windows
On Windows please consider using Filezilla client
https://filezilla-project.org/
or WinSCP
http://winscp.net/eng/download.php
Graphical User Interface
Please read the Remote Visualization instructions